Art and Science in the Classroom
 |
|
|
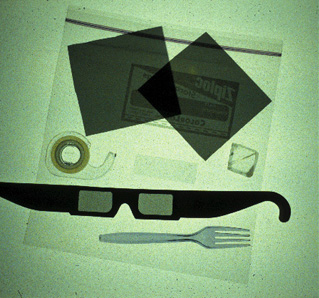
Lab-in-a-bag
Polaroid filters, birefringent tape, Laser Amazer glasses, plastic fork
Image courtesy of Chris Chiaverina
|
|
|
|
|
|
|
Creating links between art and science in the classroom is often quite difficult, but the interdisciplinary approach proves a highly effective means for teaching these two disciplines, and their connections. In the following essay, you will find three classroom project ideas (not complete lesson plans) based upon three basic physics principles that may be executed either by combining art and physics classes or with a physics class alone. All of the projects fulfill State Goals and Academic Standards in science.
Light and Color: Additive and Subtractive Mixing
Primary colors are defined as a set of three colors that, when mixed in various combinations, can produce every color in the spectrum. Scientists work with two sets of primary colors—red, green, and blue when dealing with light (also known as the “additive primaries”), and magenta, cyan, and yellow when dealing with pigments (also known as the “subtractive primaries”). Artists use one set of primary colors—red, blue, and yellow. In all cases, all the possible colors of the visible spectrum can be obtained by mixing these primaries in different combinations and proportions.
When working with light, the scientist may use a process of combination called additive mixing , which can be demonstrated by projecting colored light in the three additive primaries onto a white screen. In a dark room, when a red floodlight (available in any hardware store) is projected onto a screen, the screen will appear red. When a green floodlight is projected over the red, the screen will appear both brighter, since light has been added, and yellow, since the combination of red and green light is perceived as yellow. (The combination of red and blue light is magenta, and the combination of green and blue light is cyan). When blue light is projected over both red and green the screen appears even brighter. If these three primaries are combined in the right proportion (with the proper luminent intensity), the screen will also appear white, since all the colors in the visible spectrum—from red to blue—are present.
Artists and scientists employ a process called subtractive mixing when dealing with materials that selectively absorb light—like colored filters or paint. The sole purpose of the filter is to “subtract” a certain portion of the spectrum from the white light that passes through it. If you hold a red filter in front of an ordinary white light source, you see red, because the filter blocks the other two additive primaries—blue and green—from passing through. When white light passes through a magenta filter, the filter transmits red and blue light but subtracts green light. The cyan filter transmits blue and green light but subtracts red light. The yellow filter transmits green and red but subtracts blue. Subtractive mixing of any two of these three primaries will produce one of the additive primaries, which may be illustrated by combining two filters and passing white light through them. If white light passes through both a cyan and magenta filter, the cyan filter first transmits blue and green light and subtracts red; the magenta filter then transmits the remaining blue and subtracts yellow. Thus the combination of these two filters, or pigments, creates blue, one of the additive primaries. When light passes through all three filters, the result is black, because the filters subtract all portions of the visible spectrum.
Artists also employ subtractive mixing when working with paint, although the artistic set of primary colors is slightly different—red, yellow, and blue. When an artist applies paint to a canvas or paper, the same process of selective absorption takes place. Red paint appears red because it absorbs blue and yellow light; blue paint absorbs yellow and red; and yellow paint absorbs red and blue. All three pigments mixed together absorb or subtract all portions of the visible spectrum, producing black pigment.
For an interdisciplinary project, art and physics students may come together to explore the different approaches of the artist and the scientist to color and light. The materials for the activities are distributed in Zip Lock bags—called “lab-in-a-bag” (above)—which simplify storage and expedite the distribution of materials. Groups of four are given one lab-in-a-bag containing two sets of colored filters, a pair of polaroid filters, tape, and four pairs of “Laser Amazer” diffraction glasses, which break light into its component colors.
Students begin by putting on the Laser Amazer glasses and viewing various light sources. They discover that light—white and colored—is actually made up of many different colors. When ordinary white light from an incandescent light bulb is viewed through Laser Amazer glasses, it is refracted into a prismatic array of color, incorporating the entire visible spectrum. When a neon source is viewed through the glasses, only certain colors will be visible. Students should view several different light sources and record what spectra appear.
The Laser Amazer exercise leads students to an exploration of color mixing using the sets of colored filters in their lab-in-a-bag. Students can experiment with additive and subtractive methods of color mixing by projecting light and viewing a light source through the filters. If watercolor paints are available, students may also experiment with subtractive mixing with pigments and then compare the methods and media of the artist and scientist.
The Art and Science of Polarization
Light from a common source such as a light bulb, a candle, or the sun is unpolarized, meaning that the electromagnetic waves that comprise the light vibrate in all directions. Polarized light consists of waves that vibrate in a single direction. There are four methods of converting unpolarized light into polarized light. Passing it through a Polaroid filter is the simplest.
Look through a pair of overlapping Polaroid filters: You will see that the intensity of light changes as one filter is rotated with respect to the other. When the filters are “crossed”—when the direction of polarization of one filter is perpendicular to that of the other—no light passes through the combination. However, when certain types of clear plastic or transparent tape are inserted between the filters, colors appear. In effect, this doubly refracting, or birefringent, material rotates each color’s direction of polarization. The result of inserting birefringent material between Polaroid filters is that only a certain color is allowed through the sandwich of filters and plastic. The amount of rotation depends on the thickness of the material: the thicker the material, the more the rotation. By inserting various thicknesses of birefringent tape, different colors will appear.
After exploring the basics of polarized light and birefringent material and discussing the basics of artistic composition, students apply their knowledge to make works of art. First, students make test strips by layering tape on microscope slides and placing the strips between Polaroid filters. This will help students determine the exact relationship between color and tape thickness. Once they have created their color keys, students produce polarization art by placing carefully cut pieces of tape on a clear substrate, such as a sheet of overhead transparency material. When viewed through Polaroid filters, the resulting work has the appearance of luminous stained glass.
Anamorphosis
Anamorphosis, from the Greek anamorphos, which means to transform, is a process that stretches and distorts images beyond recognition through the sophisticated application of the laws of perspective. When anamorphic images are viewed from the proper angle or, in some instances, with the aid of a reflecting cylinder or cone, the distorted images appear quite normal. The Renaissance artist Leonardo di Vinci is often cited as the first artist to experiment with anamorphosis. His form of anamorphic art did not require the use of mirrors, only the correct point of view. Using this approach, known as slant anamorphosis, distorted images become intelligible when viewed from a particular angle. This technique was later used by the 16th-century Dutch artist Hans Holbein to conceal a skull in the famous anamorphic painting, The Ambassadors (1533). (To view an image of the anamorphic skull in perspective, click here.)
Anamorphic art, which flourished between the 15th and 18th centuries, is now generally regarded as an artistic curiosity, although practitioners of this technique may still be found. Contemporary artist William Cochran created an anamorphic mural of a young woman on the side of a bridge in Frederick, Maryland. Like Holbein’s Ambassadors, Cochran’s painting is only intelligible from a particular vantage point. However, when the viewer stands in the proper location, the image appears to be in perfect linear perspective.
Students duplicate this technique of anamorphosis in class during their study of curved reflectors. First, students draw an image on a rectangular grid. Then, point by point, they transfer their images to cylindrical grids, which will deform their drawings. To see their drawings in their undistorted forms, they view them in cylindrical reflectors.
|
Suggested materials |
| Leeman, Fred. Hidden Images: Games of Perception, Anamorphic Art, Illusion: From the Renaissance to the Present. New York: Harry N. Abrams, 1976. |
Laser Amazer diffraction glasses
(# NB2514 – 50 glasses/$13.50; 100 glasses/$26)
Kipp Brothers, Inc.
240 – 242 South Meridian Street
Indianapolis, IN 46206
1-800-428-1153 |
Color filters
Arbor Scientific
P.O. Box 2750
Ann Arbor, MI 48106-2750
1-800-367-6695 |
Color filters
Grand Stage Lighting
630 West Lake Street
Chicago, IL 60661-1465
(312) 332-5611 |
Lee filters (~$6/sheet for class of 30)
Dark Blue - #119
Primary Red - #106
Forest Green - #327
Medium Blue Green - #116
Deep Straw - #015
Bright Pink - #128 |
Rosculene ( ~$6 sheet for class of 30)
Blue - #863
Red - #823
Green - #874
Cyan - #877
Yellow - # 806
Magenta - #837 |
|
Adapted from the lecture “Art and Science in the Classroom” by Chris Chiaverina.